Comparison of two Files for forensics investigation by Compare IT

Compare It! displays 2 files side by side, with colored differences sections to simplify analyzing.  You can move changes between files with single mouse click or keystroke, and of course you have ability to edit files directly in comparison window. It can make colored printout of differences report, exactly as it's on the screen. It supports regular expressions, so you could easily strip XML tags from file to compare XML with XML or XML with text!? While running on all MS Windows variants, Compare It! can compare merge save text files from DOS, Windows, UNIX, Mac systems. It can create HTML report of your results.
Compare It! supports auto-backup folder with old file versions, so you could always revert your file after inaccurate merging.

First of all install the Compare It from the Link given below.

http://www.grigsoft.com/wincmp3.htm

Click on Compare It Tool, It will show a window to select the files to be compared.
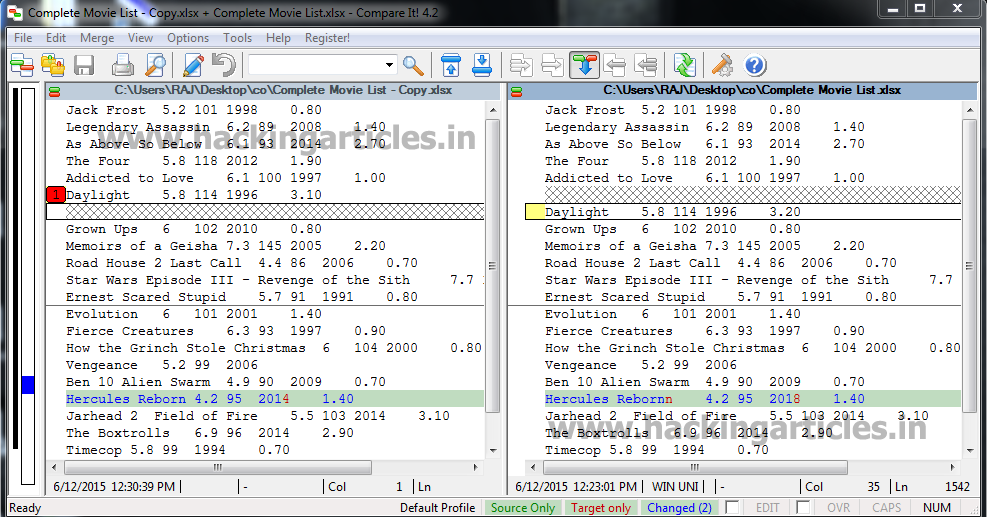
First select the first file and click on open and then select the second file and click on open


Now it will show us the changes in highlighted bar.


Now click on View and select Next Change and it will show the next change.


Now click on view and select Changes only. It will show all the changes simultaneously.


Now click on Merge and Select Separate Option.It will separate the changed lines.


Now select Edit checkbox in status bar. The cursor will move to the changed line and now the text can be edited.

Live Case Investigation using Autopsy

First Download autopsy from here and install in your pc.

Click ‘Create a New Case’ option.


A new page will open. Enter the details in ‘Case Name’ and ‘Base Directory’ and choose the location to save the report e.g. :c\users\raj\desktop\auto. Then click on next to proceed to next step. 


Here in next step you have to enter the case number and Examiner details and click on finish to proceed to next step


 A new window will open .It will ask for add data source in Step 1. Select source type to add & browse the file Path and click on NEXT Option to proceed further.


In Step 2.  Configure ingest Modules I have chosen all the modules as I am looking for complete information on evidence device or disk or system  etc. and click next to proceed further.


In Add Data Source just click on finish to generate the report of the device and you can perform complete investigate on the victim device or system or any other disk. It will process the data Source and add it to local database.


After Process completion, it will show Forensic Investigation Report. Now click on Devices Attached option, it will show the list of attached device with system.


Now click on EXIF Metadata (Exchangeable image file format for images, sound used by Digital Camera, Smartphone and scanner).It will show the image files.


Now click on Installed Programs to see the entire installed programs in the system.


Click Operating System Information. It will show the entire operating system list.


Now Select Operating System User Account Optiion . It will Display  the name of all the user Accounts.


Now click on Recent Documents Option, it will display latest created or opened documents.


Click Web Bookmarks Option to see all the bookmarks by system users in different browsers.


To see web cookies, select web cookies option.


To See Web Downloads, Click on Web Downloads option.


To check internet History, click on Web History Option.


To see the history of internet search, click on Web Search Option.


To see the list of all email ids in the system, click on email address.

How to Install Digital Forensics Framework in System

DFF (Digital Forensics Framework) is a free and Open Source computer forensics software built on top of a dedicated Application Programming Interface (API).

It can be used both by professional and non-expert people in order to quickly and easily collect, preserve and reveal digital evidences without compromising systems and data.

To install DFF (Digital Forensics Framework), firstly install python from link given below

Python from Here.


Install PyQt4 from Here  . These both are prerequisite for DFF.


Now click on I Agree Option


Select the type of install & click on Next.


Choose Python Installation Folder & click on Install.


Now Install DFF from Here & click on Next.


Click on I Agree to proceed Further.


Now Choose Destination Folder to Install DFF 7 clicks on Next.


Now Choose Start Menu Folder & Click on Install.


Click on Finish to complete the installation.


How to Mount RAW Image and ISO Image as a Drive using OSF Mount

OSFMount allows you to mount local disk image files (bit-for-bit copies of a disk partition) in Windows with a drive letter. You can then analyze the disk image file with PassMark OSForensics™ by using the mounted volume's drive letter.


First of all, we are clicking on My Computer option & it will show us all physical drives and removable storage drives.


First Download OSFMount from here and install in your pc then open OSFMount and click on Mount new button.


Now load the Evidence Disk Image by clicking on Browse Option


Now it will show the mounted Image.


Now click on My Computer. It will show you the Mounted Image as a Drive.

Forensics Investigation of Facebook, Skype, and Browsers in RAW Image using IEF (Internet Evidence Finder)

Internet Evidence Finder is designed to find Internet-related data or files on a hard drive as part of a digital forensics investigation. In this regard, the purpose of this application really contrasts the simplicity of its design.

Features
·         Browser Activity
·         Instant Messaging
·         Chat Apps
·         Social Networking
·         P2P File Sharing
·         Web Search
·         Search Toolbar
·         Media Files
·         Webmail
·         Cloud Drive Mapping

First Download IEF from here and install the IEF & open the tool IEF. Now click images first.


Select the image file to load & click on open option.


It will show the image file. Click on Next.


Click on ok.


Now it will show the location and search type .Click on next.


Select the items which are to be investigated. Click on next


Click on browse to select the destination folder. Assign the case Name, case no. & Examiner’s name.Click on find evidence.


Now it will show us the processing status.


After process completion, IEF report. Now click on FaceBook URLs. It will show all the FaceBook URLs with date and time.


By clicking on Google Analytics URLs, it will show the details of URLs with page title and host name.


 Now click on Google search, it will show the URLs with original search query.


By selecting Skype Chat Message, it will show the Message and identifier.


Now select FaceBook Chat Option. It will show the FaceBook chat message.


By selecting FaceBook status update. It will show the updated status.


By clicking on any one of the Browser activity option such as opera/360 safe browser. It will show opera history.


By selecting IE inPrivate/Recovery URLs. It will show IE history.